若有任何問題請來信:gss_crm@gss.com.tw
Event-driven 運用 - 以Queue來實務模擬運作

最近有架構師前輩指導,得知了 Event-driven 的好處。 Event-driven 可以拿 Observer pattern 來做類似的說明比較,大致上就是有什麼動作執行同時就觸發事件來作即時的通知,可以達成 Real Time 的效果。
傳統大多都是以 polling 的方式,不斷地讓系統去花費資源,得到要執行的目的。而 Event driven 卻恰恰相反,可以讓系統處於閒置的狀態,當真正有需求進來時才會真正花費系統資源處理,所以是可以有節省資源與有效運用資源的好處。未來的系統,應該可以搭配此一概念廣泛使用,達成未來的需求目的。
我們可以使用Queue來達成即時通知的效果,做到Event-driven RealTime 的目的;
以簡單的例子來模擬 Event-driven。首先會使用 Rabbit MQ來展示,然後用自製的Queue類別來達成。不管用什麼 Component 來實行,仍然要注意的是送入Queue的物件是否重要到不可以憑空消失,或者因為斷電又復電後資料不見好像沒發生過事情一樣。可以朝二方面著手:
1. Queue或其它實行的component有符合需求的管理模式作配套。
2. 送入物件過程如果失敗是可以有重送的機制。
以上的配套其實有它的複雜性,先提出作考慮,這邊主要以展示基礎實行為主。
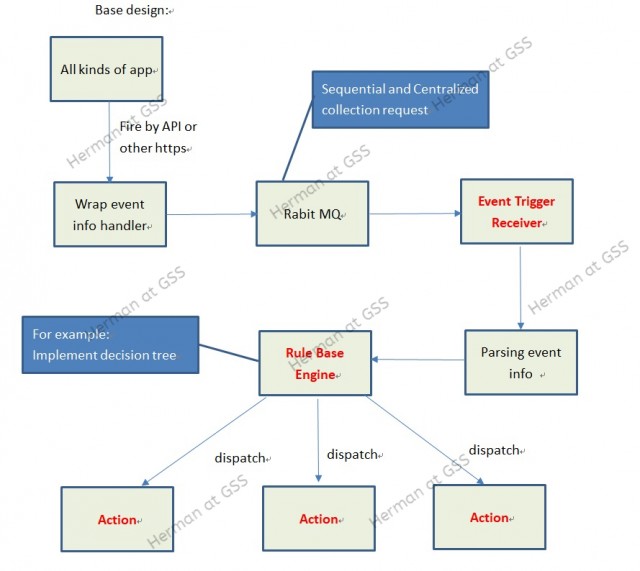
簡單設計概念圖如下:
[Produces("application/json")]
[Route("api/[controller]")]
[ApiController]
public class FirstRabitMQController : ControllerBase
{

	public string Get(string name)
	{

		var factory = new ConnectionFactory() { HostName = "localhost" };

		using (var connection = factory.CreateConnection())
		{
			using (var channel = connection.CreateModel())
			{
				channel.QueueDeclare(
					queue: "hello",
					exclusive: false,
					autoDelete: false,
					arguments: null
					);

				string message = name;
				var body = Encoding.UTF8.GetBytes(message);

				channel.BasicPublish(
					exchange: "",
					routingKey: "hello", basicProperties: null,
					body: body);


			}
		}
		return $"Hello,{name}  {outterMsg}";
	}

}
在建立後台立即接收Rabbit MQueue 的事件驅動。
static void Main(string[] args)
{
	RunAPI();
}

private static void RunAPI()
{
	var factory = new ConnectionFactory() { HostName = "localhost" };
	using (var connection = factory.CreateConnection())
	using (var channel = connection.CreateModel())
	{
		channel.QueueDeclare(
			queue: "hello",
			durable: false,
			exclusive: false,
			autoDelete: false,
			arguments: null);

		//event driven
		var consumer = new RabbitMQ.Client.Events.EventingBasicConsumer(channel);
		consumer.Received += Consumer_Received;


		channel.BasicConsume(
			queue: "hello",
			autoAck: true,
			consumer: consumer);


		Console.WriteLine("Pess any key to exit");
		Console.ReadLine();
	}
}

private static void Consumer_Received(object sender, BasicDeliverEventArgs e)
{
	var body = e.Body;
	var message = Encoding.UTF8.GetString(body);
	Console.WriteLine($"Received: {message} {DateTime.Now.ToString("yyyy-MM-dd hh:mm:ss")}");

}
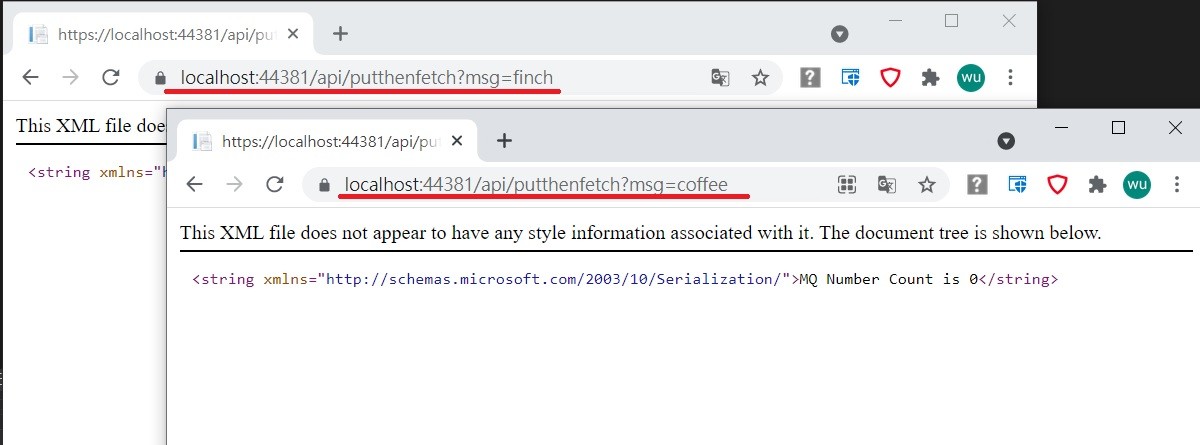
接下來就是實行,使用HTTP Request 來發API,此範例依序打了三個資料,後台會立即發現有資料送到 Rabbit MQ中了,觸發
對應的事件。這邊事件是作取出後秀出內容。

Event-Driven 中介驅動透過 Queue是非常簡單與方便的。但是如前提所述,仍然要考慮好配套。
如果再非常單純的情境下,只是要展示一個中介驅動,也可以自己客製一個組件,而之後再繼續把配套補齊。
以下是簡單的範例來示範一個使用.NET Queue 物件的中介驅動。
首先是類別:
public class MediumQueue
{
	public static MediumQueue MQ = new MediumQueue();

	private readonly Queue<object> queue;
	public event EventHandler Notify;

	private object _objLock;

	protected MediumQueue()
	{
		queue = new Queue<object>();
		_objLock = new Object();
		Notify += (sender, e) =>
		{
			object str = Dequeue();
			Debug.WriteLine("object is " + (string)str);
		};
	}

	protected virtual void OnChanged()
	{
		if (Notify != null) Notify(this, EventArgs.Empty);
	}

	public virtual void Enqueue(object item)
	{
		lock (_objLock)
		{
			queue.Enqueue(item);
			OnChanged();
		}
	}

	public virtual void EnqueueNotNotify(object item)
	{
		lock (_objLock)
		{
			queue.Enqueue(item);
		}
	}

	public int Count
	{
		get { return queue.Count; }
	}

	public virtual object Dequeue()
	{
		object item;
		lock (_objLock)
		{
			 item = queue.Dequeue();
		}
		return item;
	}

}
接著是API:
public class QueueController : ApiController
{
	[HttpGet]
	[Route("api/PutThenFetch")]
	public string put(string msg)
	{

		for (int i = 1; i <= 10000; i++)
		{
			MediumQueue.MQ.Enqueue(msg + i);
		}


		return "MQ Number Count is " + MediumQueue.MQ.Count.ToString();
	}

	[HttpGet]
	[Route("api/pureput")]
	public string purePut(string msg)
	{

		for (int i = 1; i <= 10000; i++)
		{
			MediumQueue.MQ.EnqueueNotNotify(msg + i);
		}


		return "MQ Number Count is " + MediumQueue.MQ.Count.ToString();
	}


}
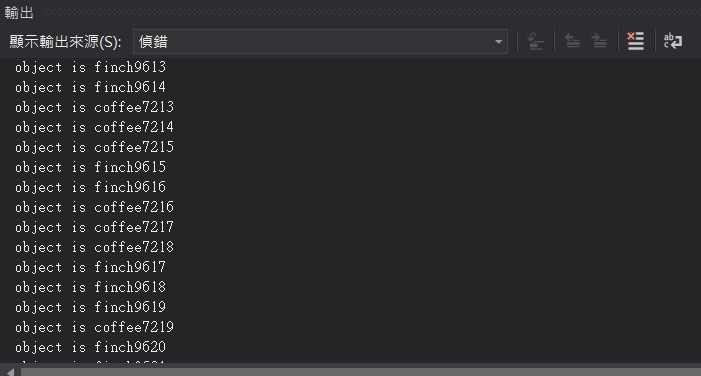
最後就是實行的狀況,送入Queue後立即觸發事件來印出訊息。
透過簡單的例子來體驗 Event-driven 是怎麼回事,與要了解之後仍需配套等搭配才能完整。
When you subscribe to the blog, we will send you an e-mail when there are new updates on the site so you wouldn't miss them.
評論